The delivery price is calculated during checkout based on your location and the goods ordered. Our basic delivery prices are:
Delivery within USA: $40.00
Delivery Service: Five working days*
* For products that are in stock and the order received by midday.
Some products go through a final configuration and calibration before being shipped. If the calibration labs are busy this can add up to two days on to the delivery schedule but guarantees a fresh calibration.
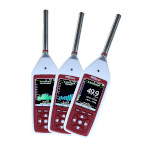
The CR15xB Optimus Industrial is a calibrated, professional grade sound level meter for noise measurements that must meet the relevant international standards. Despite being a powerful meter it is extremely easy to use, ensuring you get the correct measurements from the start.
The Optimus range of sound level meters uses the latest display technology and digital signal processing (DSP) techniques to provide you with a very powerful yet easy to use meter. The ease of use comes from the fact that all parameters are automatically measured at the same time, so no need to think about what you need in the split second before starting the measurement.
Making measurements usually consists of checking the calibration (adjustments are automatic), recording a voice tag if required, and then taking the readings.
As this meter is a data logger all the measurement parameters are stored along with time, date and other relevant information.
If you decide at a later date that you need an Integrating sound level meter or even octave band filters then we offer a simple upgrade path.
These features can be added at a later date. Some can even be fitted without returning the meter to the factory by remote update.
We can even change the meter from Type 2 to Type 1, although of course it must be returned for this upgrade.
Visit the Options tab for more details.
Optimus sound level meters can be supplied alone or as part of a noise measurement kit.
If your application does not require the use of a calibrator, or if you already have a suitable calibrator then the sound level meter can be bought on its own. In this case you will receive the sound level meter, windshield, NoiseTools software and calibration certificate.
However, most regulations state that you should use a sound level calibrator to check the function of the sound level meter before and after making noise measurements.
The "Noise Measurement Kits" listed on this page include everything you need for most applications. The order code for a kit begins with "CK" and includes:
The Optimus Industrial is ideal for applications that need a wide measurement range (20 to 140 dB) but do not need an integrated average (Leq or Lavg). This data logging version offers more in depth reporting via the NoiseTools software, which is included with the meter.
As this meter meets the strict international standards to Type 2 or Type 1, depending on the model you choose, it can be used to make accurate and repeatable measurements.
If the regulations you are measuring to do not require an integrating meter then this one should be ideal.
The standards for fire alarm testing usually demand the measurement of the "A" weighted "Fast" sound level. The CR152B sound level meter provides this measurement.
The Optimus Industrial has both AC and DC outputs, making it ideal for connection to a data logging system via a suitable A/D converter. Please note that some outputs require an extra cable. Please contact us for more information.
One of this meter's most useful features is its ability to measure all the noise parameters at the same time. When the time comes to make a measurement, you have no doubts about whether you have the correct settings.
Measures all parameters at the same time:
For download to the software the meter stores:

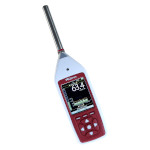
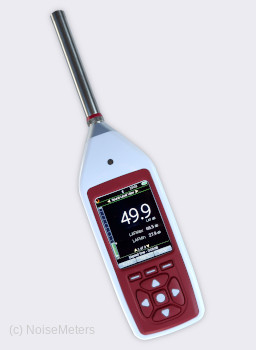
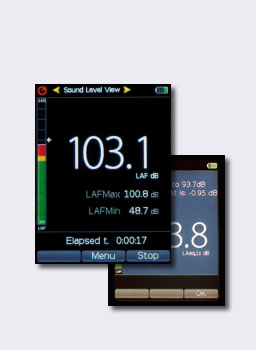
Most noise measurement regulations will clearly state the parameters that should be measured. For most, this will include the "A" weighted Sound Level, with a time response of either Fast or Slow. To keep things clear, the meter shows only the most commonly used parameters on the screen.
In this example, the display shows the current Sound Level as a large number. Below that are the maximum and the minimum and the measurement time.
The bar on the left shows the current sound level. It can be set to change color when preset levels have been exceeded.
The display shows the commonly used parameters but the meter stores the maximum sound levels for all time and frequency weightings, along with a time history for the more common ones.
Summary Store
The overall parameters for the noise measurement are stored for all frequency and time weightings.
Time History Store
The meter can be set to store time history measurements at one of a number of rates between 10 ms and 2 seconds. Four maximum sound level (Lmax) values are stored for each sample: LAFmax, LASmax, LCFmax, LCSmax.
Voice Tag
Before starting a measurement, the meter will ask if you want to record a "Voice Tag". The meter will record any speech or the noise in question (to help you identify it later) for up to 30 seconds. This audio is transferred to the software automatically along with the measurement.
You can skip this stage if you don't need a voice tag, or the option can be disabled altogether.

The Optimus range of sound level meters have a single measurement span and measure all the noise parameters at the same time. This means that you do not have to think about a range setting (there isn't one) or which measurements you need first. Just switch on and make the measurement.
The meter takes just four AA batteries (included), which should last at least 12 hours - that's a lot of noise measurements.


Press the Start button to begin the noise measurement
Once running, the meter will show the current sound level along with the maximum and minimum levels. Other parameters can be viewed (such as "C" weighted and "Z" weighted levels) by using the up and down arrow keys.
The meter is already storing measurements. It stores everything, no need to choose anything here.

At the end the measurement process press the Stop button. The display will show the most common measurement parameters: Maximum Sound Level and Minimum Sound Level with the usual "A" weighting applied. Using the up and down keys, you can also view the "C" and "Z" weighted values.
The measurement is automatically stored at this point, ready for download to the NoiseTools software.
The data logging Optimus (CR151B and CR152B) include the NoiseTools software - there is no extra charge for this. You can download the software to evaluate it before making a purchase.
The NoiseTools software runs on a Windows PC. It is compatible with all recent versions of Windows, from Windows 7 onwards.
You can buy the Optimus as a sound level meter on its own or as part of a noise measurement kit. For this grade of meter, most customers have the measurement kit, as it includes a sound level calibrator, which is a requirement for many noise regulations.
Order codes CR151B and CR152B include the following items:
Order codes CK151B and CK152B include the following:
| Standards | IEC 61672-1:2013 Class 1 or Class 2 |
| IEC 61672-1:2002 Class 1 or Class 2 Group X | |
| IEC 60651:2001 Type 1 I or Type 2 I | |
| ANSI S1.4 -1983 (R2006), ANSI S1.43 - 1997 (R2007) | |
| ANSI S1.25:1991 | |
| Microphone | Class 1 MK:224 pre-polarized, Class 2 MK:216 pre-polarized |
| Measurement Range | 20dB to 140dB RMS Single Range |
| Noise Floor | <18dB(A) Class 1, <21dB(A) Class 2 |
| Frequency Weightings | RMS & Peak : A, C, & Z Measured Simultaneously |
| Time Weightings | Fast, Slow & Impulse Measured Simultaneously |
| Display | High resolution display. Ambient light sensor & illuminated keypad |
| Memory | 8GB, 32GB factory fit option |
| Time History Data Rates | 10ms, 62.5ms, 125ms, 250ms, 1/2 sec, 1 sec, 2 sec (User selectable) |
| VoiceTag Audio Recording | Up to 30 seconds of audio notes with each measurement |
| Dimensions | Size: 283mm x 65mm x 30mm |
| Weight | 300gms/10oz |
| Power | 4 x AA Alkaline |
| Typically 12 hours with Alkaline AA | |
| Typically 20 hours with Lithium AA Non-Rechargeable | |
| External Power: 5v-15v via MultiIO socket via ZL:171 cable (2.1mm socket) |
| Connections | USB Type B to PC |
| AC & DC Output via ZL:174 (2 x Phono, 1m) | |
| Multi-pin IO for external power via ZL:171 cable (2.1mm socket) | |
| External Power: 5v-15v via MultiIO socket via ZL:171 cable (2.1mm socket) | |
| Tripod Mount | 1/4" Whitworth socket |
| Case | Material: High Impact ABS-PC with soft touch back & keypad |
| Environmental | Temperature: Operating -10°C to +50°C, Storage -20°C to +60°C |
| Humidity: Up to 95% RH Non Condensing | |
| Electromagnetic performance | IEC 61672-1:2002 & IEC 61672-2:2003 |
| Except where modified by EN 61000-6-1:2007 & EN 61000-6-1:2007 | |
| Language options | English, French, German, Spanish. Other language options may be available |
| Software Support | NoiseTools Download, Configuration & Analysis software supplied as standard. Compatible with Microsoft Windows 7, 8, 10 and 11 |
| Displayed Functions | LXY, LXYMax, LXYMin, Run Time |
| Stored Functions | LXYMax & Time History of LXYMax, Start Time |
| where x=A ,C ,Z; y= F, S, I |
)